I am extremely happy that I had the opportunity to review an outstanding art curriculum called Artistic Pursuits:
The Way They See It. As I reflect back to my teaching years in the classroom, I remember hearing young students giggle when I drew stick pictures on the white board to illustrate concepts being taught. This also happened to me many years before that when I taught college algebra to students as a teacher assistant. I was always embarrassed but trudged through the lessons at hand. My four-year old daughter, Alyssa, attempts to teach me how to draw "appropriately" as she says when I try to illustrate math concepts for problem-solving activities. I have never been very artistic and at times I feel the creative side of my brain is just
not working correctly. I remember enjoying art class tremendously as a child but never feeling what I produced was valued or looked "good" for that matter. As I worked with my daughter, I always put off art lessons even though I wanted badly to expose Alyssa to the elements and experience. I never knew what to do or how to approach the subject. Thankfully, I believe I have finally found a solution, an art curriculum that meets our needs as a family. I will be able to complete an art lesson in a short amount of time on a regular basis by using the Artistic Pursuits curriculum.
Artistic Pursuits is an art curriculum available for preschool through 12th grade. They have several books grouped according to the child's age on their website: Preschool (3-5), K-3, 4-6, Jr. High (7-8), and Senior High (9-12) levels. Check out the
Artistic Pursuits website for more information about these products and to read about their art
philosophy. In my personal opinion, it can be used in both classrooms and for homeschooling families. They have successfully used this curriculum in the classroom for 13 years - you can read about it
here if interested. It is very student and teacher friendly. Alyssa and I were given the chance to review the preschool book for ages 3-5. I love the fact that there is not a specific schedule to follow. The parent can do the lessons in any order which means you can do whatever lesson inspires you for the day. In some cases, Alyssa flipped through the pages of the curriculum and choose what art project she wanted to do for the day. She would choose art projects on some days based on the appearance of the master artwork presented. On other days, she looked at the art project to see if it would be something she was interested in trying. I wanted art to be a pleasant experience and because of this curriculum ... it was a rewarding experience for us all. This is a very hands-on, interactive curriculum for young artists. The content of the book is very insightful. The curriculum is full of knowledge on how parents can teach young children art and it describes the development of art for children as well. Artistic Pursuits has received many
homeschool awards for their curriculum.
Curriculum Details
Curriculum Book:
The Way They See It
Publisher: Artistic Pursuits
Writer: Brenda Ellis
Age Level: 3-5
Number of Lessons: 19 projects plus projects in the First Skills section
Number of Pages: 87 pages, comb-binding, laminated front and back covers
Edition: 2nd Edition
Cost: $42.95
This curriculum was $42.95 at the time this review was written and it is subject to change should the company decide to do so in the future. They also sell
reasonably-priced art supply packs for the older curriculums with high quality items available through their website. Prices vary depending on the curriculum purchased.
Book Organization
Section 1: The Nature of Children's Artistic Development
This section explores why children make art and how it develops over time. It teaches parents the process and methods for understanding their child's art work.
Section 2: Use Real World Examples to Point Out Artistic Ideas
This section guides the parent on how to teach children "how to see" by using real world examples. It presents ideas that focus on the familiar world of the child and their experiences in life.
Section 3: First Skills
This section contains 13 additional projects that teach proper use of materials and tools. Projects also teach art tool safety. Fine motor skill work such as scissor use, crayon holding, marker holding, etc. will help prepare your child for a positive experience with writing in the future.
Materials and Brands Recommended
In the beginning, I realized that not many art materials or media were required to complete the lessons. I gathered a few necessary art supplies from our classroom and we began our art adventure with positive attitudes. I didn't own the Mr. Sketch brand of markers which came highly recommended so I bought them with a 40% off Hobby Lobby coupon and placed them in my daughter's stocking. We used other markers for lessons before purchasing the recommended brand.
What's Needed?
Pencil
Crayola Crayons
Mr. Sketch Scented Markers
Fiskars Blunt Tip Scissors
Play-Doh
Copy Paper may need construction paper for cutting and glueing projects
Cheap, Soft Brushes
Dry Pigment Prang or Crayola Paint for 4 and 5 year olds (Liquid Paint recommended for ages 3 and under)
Finger Paints
Adhesives (glue sticks or q-tip in lid worked best for us)
*Note: I agree with the author about purchasing better quality products in the beginning. In the past, I bought poor quality art materials and ended up spending more money in the end replacing them. They mentioned an art book resource in the curriculum as a supplement. I did not need to purchase it in order to use the curriculum. This is a self-standing curriculum although if I can find the book at a reasonable price I might purchase it.
Lesson Approach
The author's approach or lesson layout is systematic in the format of teaching art hence the reason for the content being easily understood and read by the parent.
Grown-Up Talk (read by the parent before the art lesson begins)
The author guides the reader throughout the curriculum by offering tips in this section. The author explains how and what the child might learn during the lesson. The content was informative and offered practical advice when teaching art to children. This section was greatly appreciated by me and helpful in deciphering Alyssa's approach towards art and allowed me to understand her artistic development at a better level.
Picture Talk
The lesson begins with a discussion of a popular, famous art print through the use of guided questions. This part of the lesson may take approximately 5-10 minutes. It may take a bit longer if a parent adds on to the lesson. I would at times add map or globe work during the art print discussion. This was a great way to incorporate or integrate art and geography. Some days I would include the reading of a book found at the library about the actual artist noted. I am also considering the use of an art history timeline. This may be more appropriate to start in the future using the K-12th grade curriculums. I think a timeline would help Alyssa see an overview of art history and when the art print was introduced to our world. I was thinking about using colored index cards to categorize time periods or eras and a clothesline to hang the art prints. This would make the timeline more portable and easy to store. Artistic Pursuits is a thorough and complete art program that meets the age specific needs of children. I chose to supplement and extend the learning to meet Alyssa's needs, abilities, and interest or desire to know more about the art or artist.
Art Project
There is an art project that relates to or connects the "budding" artist to the master art prints discussed during the lesson. The text tells the parent exactly what and how they should speak to the child. I would not read the text directly from the book. I skimmed the text before the project and summarize it for my daughter so the lesson seemed more relaxed. The sample works of art consisted of colorful illustrations or up close photographs that captured the attention of the child. The free art time after the lesson may take anywhere from 30 minutes to one hour long depending on your child and how involved they were with the project. The art project was based on teaching essential age-appropriate elements of art.
Things We Liked
1.) The
process of creating art and not the end result or the product was the focus of and the most important aspect of this curriculum. This means so much to me - especially at this age. Too many children are forced into creating a product that looks good rather than enjoying the process and having time to explore the materials to be used. This curriculum allows the child to enjoy exploring the materials and the process. They are encouraged to use their creativity and imagination to just have fun creating art. The focus is not on worrying about what or how the art will look like in the end. The children learn to appreciate art more during this exploratory phase. Having the time to explore materials and be involved in the process feeds their desire to create more art in the future. Most of our time was spent creating ... being engaged in the process of creating real art. It is imperative that parents support, appreciate, and value the process and work produced by their child.
2.) The lessons included picture talks that introduced famous artists. Critical thinking skills were used to analyze and discuss the pictures together. The parent asks simple, directed questions related to or about the picture. The art projects were related to these picture talks so that children could apply what they learned to their artwork. The instructions or directions to the adult were clear and understandable.
3.) There is little, if any, prep work required to use this curriculum.
4.) Compared to other art curriculums or art classes available, the cost of this curriculum is very reasonable and lower in some cases.
5.) The curriculum lessons are flexible. You can decide the order of the lessons. You can repeat lessons over and over again. The curriculum can be done as often as you like or more often depending on preferences and time in the schedule. There is no strict schedule to follow in order to complete this curriculum. Another thing I like about this curriculum is that even though we already completed many lessons we can always go back to the lessons and create a different masterpiece based on the same criteria or we could try a different media.
6.) I am glad that the author encourages the parent to sit down and complete art work on a separate piece of paper with and
beside the child. I also was glad to hear that the author discouraged parents or teachers from changing or altering the child's work. The parents does not cut or draw for the child. The child learns to handle new tools and materials so that they can acquire the skills needed later in life. The final product would be
their work ... not one of combined efforts. I always displayed Alyssa's work for daddy to see. She gained a sense of accomplishment and was proud of the work she created on her own.
7.) The format of the book was
very easy to follow and in NO way overwhelming or frustrating. I have set aside other expensive art curriculums that I purchased due to an overwhelming approach or due to a format with detail overload. The format or layout has to be appealing to the teacher or else the curriculum won't get used as often as it should. The fonts chosen were pleasing to the eye and the lessons were concise or short.
8.) The art curriculum included sample artwork done by children of the same age. Alyssa was able to observe art pieces completed by children just like her ... this ended up encouraging and motivating her to participate more in lessons. She saw that other children tried the lesson and had beautiful art works of their own.
9.) Students have the opportunity to experience art using several different art mediums or media.
10.) This is a non-consumable curriculum. Alyssa's works of art were created on separate pieces of large paper. This book can be passed on to friends and family or even used for additional children at a later time.
11.) I also like that it is NOT a drawing or activity book with tiny boxes for drawings. She is not copying simple drawings - she gets to create based on observing her surroundings. Alyssa has her own sketch book to practice the larger hand and arm movements involved in creating art.
12.) The curriculum can be enjoyed by the entire family.
13.) Artistic Pursuits meets
National Standards for Arts Education.
14.) The Grown-Up Talk as mentioned above was extremely helpful.
15.) Company Contact - It was a pleasure being able to work with and communicate with Brenda in regards to reviewing this curriculum. I was sent a list of materials to gather in advance before the curriculum even arrived on our doorstep.
Overall,
The Way They See It was a simple, convenient art curriculum that was extremely easy to use, interactive, and fun for all. The book tells a parent exactly what to say and how to teach the art concepts in simplistic terms. I feel that anyone can use this curriculum as a guide to teaching art. The curriculum gave us the opportunity to give Alyssa early experiences or exposure to the processes of art and to observe major art works with a creative eye. She appreciates art more and is able to express herself through art. She is definitely more aware of the the things she sees in our world. Alyssa has made several connections to the art works studied to the things she has seen in her environment or world. I have seen her artistic knowledge and use of art terminology grow over time while using this curriculum. She is engaged while using her senses to observe and create art.
What We Would Change
The only two things I can see being problems are the need for more projects at this time and the need for larger prints of several of the master artworks. For most families, the number of activities would suffice but I have a feeling Alyssa will want to do more art projects which means we'll complete this curriculum very quickly. We'll need to repeat activities or purchase the next level soon (before the year is up). There were several art prints that I wished were a bit larger. It would have been easier to discuss the details of the artwork if they were not as small. Most art prints were at least half of the page or more in length.
What Some of You Might Not Like
The preschool curriculum does not present art in a chronological order. The curriculum lessons are presented based on the elements of art, early exposure to art, and use of art tools and media which is appropriate for the age range specified.
Art history and art elements are presented in a more sequential study throughout the curriculum over the years. Click on the link above to read more about their approach to teaching art history and art elements.
The Day Artistic Pursuits Arrived
I believe that I took photographs on the day the curriculum arrived but I can't seem to find them on my computer anywhere. I do remember Alyssa tearing open the package. She spent at least 30 minutes flipping through the pages while asking me questions about the curriculum. I was thrilled to see her excitement about having an art curriculum. She was the first to see the book ... I didn't even have a chance until after she was done looking through the contents.
Alyssa's Artwork
I photographed in the beginning until I started noticing it was disrupting the flow of the lessons. So, I decided to set the camera aside and enjoy our time together talking about art and being "artists." Here are a few beginning shots we took to share with you all.
Lesson 2: Learning from Parents and On Their Own - The Sky I See Project
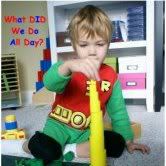
After our art discussion, we decided to actually locate Toledo on the globe. Alyssa went to the back porch and decided where she wanted to set-up her work area (notice the lovely tub we used). She looked in all directions of the sky and chose her "perfect" spot. A storm was approaching and the clouds began to darken. I took the time to discuss different types of clouds. The birds were rustling about trying to find coverage before the rain hit (which we SO desperately needed). This was another teachable moment we could not pass up. We walked over to the other side of the porch where the bird was perched upon a tree. We discussed the characteristics of a bird and noted his markings. Later, we searched our Anna Comstock book for more information about this bird. Alyssa returned to her work and observed the raindrops. You can't really see them in the picture because she draws so lightly but the raindrops were included in her artwork. She saw and drew bits of blue sky and the sun trying to peek through the clouds. She also drew the cute, little bird we saw in the final piece. She really enjoyed being able to observe the natural world around her. She is becoming more aware of her surroundings and the things seen every day.


Lesson 1: It's About the Process - Discover Art Project
We discussed real objects compared to objects seen in pictures. Alyssa used her senses to explore the objects. We also used scientific and mathematical terminology to identify and describe the attributes and textures of objects. We only had a few fall colored flowers in the house and Alyssa insisted on doing this activity THAT day. She chose and arranged the objects for the still life on a table as seen in the picture. She chose a pinecone, plastic ant, feather, fake leaf, and a rock we use during Easter. She felt the texture of the objects and we discussed the characteristics of each item before she began creating art. Later that day ... hours after art class, I asked her how many legs an ant had and she knew the answer. But, somehow her ant grew a couple extra legs in her picture. I was just curious if she knew that ants had six legs. I love the thinking shot! She is so focused during art time. The black underneath the ant is the inside of the rock. The rock was shaped like the cave Jesus was buried in and she saw a "shadow" or darkness inside the rock that she felt inspired to draw. LOVE IT! I wish I had more colorful flowers around the house. The bottom picture is her describing or narrating her art work to daddy. Her communication skills are developing through narration or talking about her art works produced. I wanted to encourage her to title her art works but we were so engaged in the process that it slipped my mind.


She learned that sometimes you have to look at the outside edge of an object in order to draw a recognizable figure. The art elements discussed here were line, shapes, and color. We checked out a book titled,
Georgia and another book on flowers close-up since many of Georgia's O'Keeffe's art masterpieces were of flowers. Alyssa and I did a hand tracing activity for a Spanish art lesson awhile back so she didn't need any help tracing the outline of her hand. I thought she was going to choose rainbow colors because it seemed like everything she colors lately is done using rainbow colors. She kept it simple and talked about coloring in the hand but she was distracted. Check out her CRAZY face! I have to say that she recently applied the skills learned during this lesson to a Valentine's Day card she made for her gymnastics coach. She traced a heart she found and outlined it several times. Then, she colored in each section. The card was made at the last minute while I worked out so I was unable to take a picture. I wish I did because it was beautiful! I was so excited when I glanced over at her work and saw what she had done.

Alyssa's other favorite projects were the Dough Project, Telling a Story Project, and the Story Book Picture Project. I am sure that she'll LOVE more of the lessons along the way. I look forward to trying the Me and Trip Project
very soon. Each day we complete an art lesson it is a huge success and I owe it all to Artistic Pursuits!
Our Opinion
Alyssa is very enthusiastic about this curriculum and she LOVES the art projects! When I asked her ... she said, "I liked that I got to draw outside." Her favorite lesson was drawing the sky. I asked her why and she said, "because I drew so beautifully. I was able to look at everything ... like the clouds, the birds, the trees that were in front, back of me, and to the side." I highly recommend this art curriculum for ages 3-5. The curriculum exceeded my expectations and was engaging for us all. It was a wonderful experience to be able to relax and work on my own art creations beside Alyssa. This curriculum encouraged her to think creatively and was an inspiration to me. It gave me the courage and knowledge I needed to teach art. This is a GREAT curriculum and we highly recommend it. I am
not an artist by any means but I can say that I have gained the confidence needed to teach art to my daughter using this curriculum. If Alyssa had it her way she would do the lessons from this curriculum on a
daily basis. One day she chose this curriculum as her FREE ticket item after completing her chores. I was so shocked! Of course ... this does come from a child that told her daddy she didn't want to go outside to jump on the trampoline because she wanted to fold and put away her laundry (this is also one of her paid chores ... she receives a couple pennies). LOL! Alyssa continues to enjoy this curriculum
tremendously to this day. She didn't just like it in the beginning because it was a new item in our house and become disinterested over time. This is definitely "a book for EVERY parent." This curriculum helps parents engage children in creating art while teaching the parent about the art they make.
You can purchase the curriculum on their
website by adding the item to your cart or purchase it through
participating companies. They have a no risk satisfaction guarantee for individual orders. If you are not satisfied with the curriculum they will refund your order (excluding shipping) when the item is returned in unused condition. Purchases can be made via Paypal, Credit Cards, Check, or Money Order.
Special Shot Out!!!
Thank you Brenda for allowing us to review such a well thought out, excellent curriculum. It was truly a blessing for our family! I can't tell you how many wonderful hours we spent creating masterpieces of art together. I had a hard time deciding which pictures to post. I was truly impressed with this curriculum. I will be attending the Mid South Homeschool Conference in Memphis, TN and I hope to thank you personally for allowing us to review this curriculum. I checked the conference schedule to see if you will be attending the event and it looks like you'll be there.
Note to Parents: If you are attending one of the conferences listed on their website, I encourage you to stop by the Artistic Pursuits booth to discuss the curriculum and art with Brenda. Take a peek at the curriculum and see if it would be the ideal curriculum for
YOUR family. Read other parent or teacher testimonials
here or
contact the family owned company with questions about the curriculum.
Disclaimer
I received this curriculum free of charge in exchange for an honest, professional review on my blog. As always, these opinions are my own and are not influenced by the company or by the product. The opinions are based on our experiences which
may differ for each family or classroom.
Thank you,
Tracey