Wizard of Oz Birthday Party
I thought it would be fun to write up a fun birthday party theme for my Blogging Through the Alphabet "Letter W" post. We threw my daughter a Wizard of Oz birthday party when she turned four (she's 5 now). Yes, saw the movie and LOVED it! She was not afraid of the witch or the monkeys. We all had loads of fun planning and organizing this event together.
Birthdays are a huge deal in my house. I almost always do something special and out of the ordinary. We invite all of our friends and family members to the house. This is usually the one time of the year that we get to see everyone in one place. This is the
only big party we have all year! My husband wishes we could afford to do more parties. Unfortunately, her birthday is in November so it makes things difficult with Christmas around the corner. Yes, I know ... I could do a simple party but that is just not me.
We do our best to bring the theme alive so that the kiddos have a wonderful time and engage in imaginative play while visiting us. Our parties are meant to entertain the children. However, I think several of our friends also enjoyed this party. I wish my sister could have joined us because she is a huge Wizard of OZ fan.
Decorations
Doorbell Broken Sign
We made this sign at the last minute with a Cricut Expressions Machine.
The Yellow Brick Road Leading to the Party
I drew a yellow brick road using yellow chalk on our driveway. The chalk looks white in the photo. It started by the mailbox and lead guests to the party.
Dorothy's House
This is Dorothy's house ... you know the one that fell on the Wicked Witch. Her legs are sticking out from underneath the house. This was actually a doghouse that my husband built for her Clifford birthday party the year before, but we decided to repaint it as Dorothy's house. The legs could be easily made but I found the leg prop on sale after Halloween. The lollipops were made from round white styrofoam pieces, PVC piping, cellophane paper, glitter, red ribbon, and spray paint.
Side Note: There's a funny story about the doghouse. Our neighbors were building their house and dropped a piece of wood on our property. The gentleman told me that he didn't want to hop the fence to get it, because he saw how big the doghouse was and could only imagine the size of the actual dog. I laughed so hard! If I had known that I would have had a huge chain leading to the inside of the doghouse just to prank everyone.

 |
| Making Lollipops for the Lollipop Guild |
 |
| Character Stand-Ups (On Sale) |
Hot Air Balloon Centerpieces
I made paper mache hot air balloons for several of the tables. This project took a loooong time to complete. We placed Wizard of Oz puzzles, Playdoh, and crayons for the color sheets on the table. I used punch balloons, thin ribbon or tape, paint, newspaper, glue, and box (without lid) to create these centerpieces.
 |
| My friend dressed as the Wicked Witch |
Table Covers
We covered all the tables with green tablecloths. There were also Wizard of Oz and rainbow balloons hung.
Music
I played the Wizard of Oz soundtrack in the background. This must have annoyed someone because it was constantly turned off.
Dress Up Outfit
The outfit was given to her as a dress up birthday gift. It's hard to see but there are white pantalones underneath. I LOVED this outfit! This was the year Alyssa fractured her wrist badly during gymnastics so you can see the lovely purple cast. She LOVED her ruby red sparkly shoes from Target. The socks and hair ribbons were custom made from a seller on Etsy.
Dress-Up Time
All the guests were invited to dress up as any character from the movie. We only had a few guests willing and daring enough to dress up.
Jeff
My husband dressed up as The Scarecrow for the party and Halloween. This costume was a huge hit!
Me
My daughter begged me to dress up as Glenda, the Good Witch. I am not a fan of pink clothing at all and I hardly ever wear dresses, but she convinced me. The things we do for our children!
Guess which cake the children ate? Yep, the one that took the least amount of time to make. It is probably because I told them there was a big surprise on the inside. The kids made all kinds of sounds when we cut into this cake.
Games
Somewhere Over the Rainbow Pinata
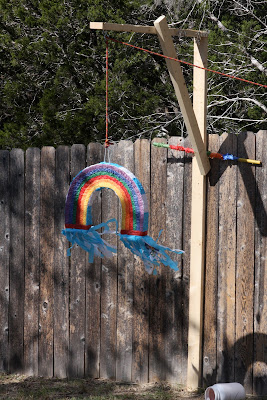 |
| My husband built the pinata stand to make things easier. |

Water Balloon Witch Game
My hand hurt from coloring this blown up color sheet. I didn't have time to color her entire dress black. The children rode witch brooms and wore witch hats to the picture and threw WATER balloons at her so that she would hopefully melt. The colors did run a little. I should have colored the entire dress.
Game Problem: The water balloons would
not break no matter how hard we ALL threw them! Oh ... I was attacked by fire ants. This was about the same time my 5" heels poked through my petticoat. The dress was so long that I had to wear the highest heels I could find. My daughter chose silver glitter shoes. Don't go there?
Scarecrow Stuffing Scavenger Hunt
The Wicked Witch and her monkeys scattered Scarecrow's Body parts in the forest. We hid and scattered the Scarecrow's parts around the yard. The children and parents worked in teams to see who could build their scarecrow the fastest. The items were gathered and the scarecrows were assembled. We propped one of the scarecrows up in the tree. Later that day my nephew took off with one of their heads. You can also see the lollipops we made for the party.
Game Problem: The game was a bit too much for our youngest guests.
Pin the Heart on the Tin Man
We ended up moving the game because the sun was shining in everyone's eyes. I cut red heart shapes using a Cricut Expressions Machine. You can also see the apple toss game in the photo. The children later filled the apples with sand. My husband had sand delivered for a yard project. We forgot all about it but it ended up being a sand box for the children to play in especially later in the day. The child that pinned the Tin Man's heart closest to the correct place won a heart-shaped clock necklace. I think I also gave each participant a heart sticker.
Witch Hat Ring Toss
We stuffed the hats with newspaper so that they would hopefully stand up tall. The broom was supposed to be on the other side of the hats. The children stand behind the broom and toss the rings.
Problem: The wind blew the newspaper out from underneath them and hats blew across the yard.
Party Favors
I found the basket boxes at Oriental Trading Company. I used the Cricut Machine to cut out the Toto patterns and then stamped the words "Thank you" in white. I filled the goody bags with a candy filled red ruby slipper, rainbow crayons, rainbow lollipops, brain squeeze balls, smarties, star wand, pink bubbles, witch finger, heart-shaped tin with mints, and an engraved dog tag necklace. The date of the party and the birthday girl's name was engraved on the dog tags. I created a scarecrow diploma and rolled it inside a "Wizard of Oz" cupcake ring with a Twizzler.
 |
| The Goody Basket |
 |
| The Goodies |
Possible Gift Ideas
Character Dolls (EBAY)
Wizard of Oz Puzzles (EBAY and Dollar Tree)
Wizard of Oz Game (EBAY)
Wizard of Oz Soundtrack (Amazon)
Dress-Up Outfits (Custom Made EBAY)
Wizard of Oz Antique Posters (I think my friend found them at Half Price)
Dorothy Build-a-Bear Doll (Build-a-Bear or EBAY)
More Favorite Photos
Alyssa thanking her guests for the birthday gifts.
I also love it when she takes time to read the card aloud.
Alyssa passing out her goody bags to the guests. I always TRY to make this her responsibility and it gives her the opportunity to say thank you to her friends. We usually pass them out before opening gifts ... that way all the children have a gift to open.
There's just something about this photo. I think it has something to do with her being a such risk taker while wearing a cast. She knew we couldn't set it up until she healed properly. We bought it for her before the accident.

Thank you for visiting! Please feel free to leave a comment. I love hearing from my readers!
God bless,
Tracey


