I have no artistic abilities or background knowledge when it comes to teaching Art. In fact, drawing stick figures is the extend of my experience. On the other hand, my daughter enjoys coloring, drawing, and painting using a variety of art mediums. Over the years she's grown into quite the little artist. I want to make sure she receives a well rounded education based on her interests regardless of my abilities so I try to expose her to the different fine arts.
John Hofland is the creator and instructor of this online art program. There are five levels ranging from 8-14 lessons available on the website. Each well developed lesson contains a lesson description, bulleted supply list, estimated times to complete the lesson, cross-curricular suggestions, and some lessons have examples of final projects. The website offers an assortment of educational resources and links related to the art project. Hofland encourages children to submit their artwork so that he can post it to his website. Artwork examples give other children ideas for their work. These online art and drawing lessons for kids can be completed by children of all ages even adults will enjoy the lessons. Younger children may need adaptations or assistance. Several project lessons offer appropriate age or grade level recommendations based on the techniques implemented and art mediums.
Entire Level II Art Projects
- The Swedish Dala Horse
- The Korean Wedding Duck
- The Japanese Goldfish
- The Elephant from Ghana
- The Ukrainian Cat
- The German Nutcracker
- The Sri Lankan Landscape with an Elephant
- Tessellations: Repeating a Pattern to Create Original Art
- The Ukrainian Rooster
- Hiding Butterflies
- The Mexican Mask
- The Russian Fortress - Color Value and Analogous Colors
- The Polish Szopka
- The Mermaid from Denmark
How We Used ArtAchieve
I used ArtAchieve with Alyssa (Age 8) as her core Art curriculum. The art lessons were uploaded to our account after creating a password. The lessons can be done in any order. The lessons were available in two formats. I asked my daughter to check out both the PowerPoint slide presentation and the video format for her first lesson. My daughter preferred watching the video over the slide presentations. She could listen, watch, and work through the lessons. She could also pause the video when she needed more time to draw. Music could be played as a child works on their project. We listened to calming Classical or Instrumental music on our computer as Alyssa created her masterpieces.
We completed at least one lesson project each week. We worked on ArtAchieve lessons approximately 2-3 times per week for 25-90 minute sessions. Some days it was easier and quicker to break each lesson into individual segments. The notes about the approximate time needed to complete each project are helpful when dividing lessons up over several days. Other days artwork required longer drying times. The project was broken up into manageable chunks due to the lesson layout. The video presentation was organized by titles which easily led to the perfect stopping points.
Each video lasted approximately 20-30 minutes. We did not complete the lessons in numerical order. We chose projects based on my daughter's interest level and current studies. Several art projects allowed us to review previously learned concepts such as the El Día de los Muertos (The Day of the Dead) and Hiding Butterflies.
We used this drawing program for kids on a MAC computer OS X 10.9.5 Adobe Reader was needed for the warm-up grid exercises and project printables available in PDF format.
Before receiving our lessons, we completed the FREE Simple Lines Art lesson from Level 1 which is the first lesson from this level. I suggest that ALL users complete this FREE lesson first, because it is the foundation of the program and all future lessons. The interior wall design of a Polish church was examined for different types of lines.
We learned about the six different types of lines: Straight lines, dots, curves, ovals, angles, and wavy lines. ArtAchieve provided us with a body movement line exercise which actively solidified learning. Alyssa used her body to create lines. This lesson also included an engaging line scavenger hunt. These two fun activities motivated my daughter to find lines in her surroundings.
Fine point Sharpie markers were utilized during the drawing lesson to help prevent and eliminate erasing. Pencils were occasionally utilized for more difficult drawing lessons. A list of art supplies are mentioned ahead of time so you can pause and prep if needed. Minimal prep time is required and no planning if you follow the lessons as stated. I simply printed out the warm-up exercises and drawing reference sheet of the subject.
Basic Art Supplies Needed
You must first log in at the top-right corner of the screen to view your lessons. You'll need to type in your e-mail and password. A list of lesson titles will be seen. Alyssa chose The Mermaid from Denmark as her first lesson. This particular lesson was meant for children in 3rd grade and up. She clicked on the lesson title or the "+" which opened a drop down menu. This is where she choose which lesson format she wanted to view. I printed the PDF formatted printout of the mermaid drawing and the warm-up. An icon of an arrow pointing downwards represents a downloadable printout.
We watched the entire video presentation beginning with the relaxation lessons. Alyssa would quickly rub her hands together until they felt warm. Then, she placed them over her eyes to relax. Deep breathing exercises were practiced too.
Warm-up grid exercises were next on our agenda. Different types of lines and curves were copied into the empty grid boxes below the drawing. These particular lines are parts of the mermaid art project. These exercises help improve fine motor skills.
The project begins with a history lesson centered around a real life object, artifact, image, or piece of art. Historical background information was shared. The Mermaid from Denmark art project was centered around a Danish coin as seen below. No inappropriate images are seen because the mermaid faces away from us.
Two more examples of object inspirations from this bundle were the Swedish Dala Horse and the Korean Wedding Duck.
There was a list of national standards and learning objectives for the lesson at the beginning of the video. Furthermore, class rules were stated such as keep silent so you can focus, draw for yourself not others, there are no mistakes, and you shouldn't erase anything.
We continued to work through the guided drawing lesson presented by John Hofland. The first part focused on the subject and the second part of the lesson taught us how to draw the background. Alyssa and I watched the video together. My daughter would often re-watch video sections to refresh her memory.
Throughout the lessons, the instructor offered suggestions such as using planning dots when drawing. He also used line lengths to approximate the lengths of newly drawn lines. Hofland guides the students with clear step-by-step instructions. Alyssa focused on drawing the subject of the lesson. His words were encouraging as he discussed "mistakes" and encouraged users to complete a project before deciding whether they like it or not.
We completed at least one lesson project each week. We worked on ArtAchieve lessons approximately 2-3 times per week for 25-90 minute sessions. Some days it was easier and quicker to break each lesson into individual segments. The notes about the approximate time needed to complete each project are helpful when dividing lessons up over several days. Other days artwork required longer drying times. The project was broken up into manageable chunks due to the lesson layout. The video presentation was organized by titles which easily led to the perfect stopping points.
Each video lasted approximately 20-30 minutes. We did not complete the lessons in numerical order. We chose projects based on my daughter's interest level and current studies. Several art projects allowed us to review previously learned concepts such as the El Día de los Muertos (The Day of the Dead) and Hiding Butterflies.
We used this drawing program for kids on a MAC computer OS X 10.9.5 Adobe Reader was needed for the warm-up grid exercises and project printables available in PDF format.
Before receiving our lessons, we completed the FREE Simple Lines Art lesson from Level 1 which is the first lesson from this level. I suggest that ALL users complete this FREE lesson first, because it is the foundation of the program and all future lessons. The interior wall design of a Polish church was examined for different types of lines.
Fine point Sharpie markers were utilized during the drawing lesson to help prevent and eliminate erasing. Pencils were occasionally utilized for more difficult drawing lessons. A list of art supplies are mentioned ahead of time so you can pause and prep if needed. Minimal prep time is required and no planning if you follow the lessons as stated. I simply printed out the warm-up exercises and drawing reference sheet of the subject.
Basic Art Supplies Needed
- Fine Tipped Black Sharpie Markers
- Pencils
- Colored Washable Markers
- Watercolors
- Acrylic or Tempera Paint
- Chalk Pastels
- Oil Pastels
- Round Paint Brushes (Varies Sizes)
- Masking Tape
- Glossy Photo Paper
- Watercolor Paper
- Glitter Glaze or Paint (Optional)
- Paint Pens (Optional)
- Paint/Drawing Board
- Paint Palette
- Rinse Container
- Apron and Table Cover
You must first log in at the top-right corner of the screen to view your lessons. You'll need to type in your e-mail and password. A list of lesson titles will be seen. Alyssa chose The Mermaid from Denmark as her first lesson. This particular lesson was meant for children in 3rd grade and up. She clicked on the lesson title or the "+" which opened a drop down menu. This is where she choose which lesson format she wanted to view. I printed the PDF formatted printout of the mermaid drawing and the warm-up. An icon of an arrow pointing downwards represents a downloadable printout.
We watched the entire video presentation beginning with the relaxation lessons. Alyssa would quickly rub her hands together until they felt warm. Then, she placed them over her eyes to relax. Deep breathing exercises were practiced too.
 |
| Clear Instructions |
Warm-up grid exercises were next on our agenda. Different types of lines and curves were copied into the empty grid boxes below the drawing. These particular lines are parts of the mermaid art project. These exercises help improve fine motor skills.
The project begins with a history lesson centered around a real life object, artifact, image, or piece of art. Historical background information was shared. The Mermaid from Denmark art project was centered around a Danish coin as seen below. No inappropriate images are seen because the mermaid faces away from us.
There was a list of national standards and learning objectives for the lesson at the beginning of the video. Furthermore, class rules were stated such as keep silent so you can focus, draw for yourself not others, there are no mistakes, and you shouldn't erase anything.
We continued to work through the guided drawing lesson presented by John Hofland. The first part focused on the subject and the second part of the lesson taught us how to draw the background. Alyssa and I watched the video together. My daughter would often re-watch video sections to refresh her memory.
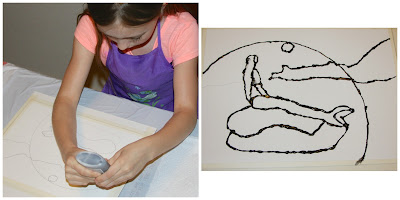
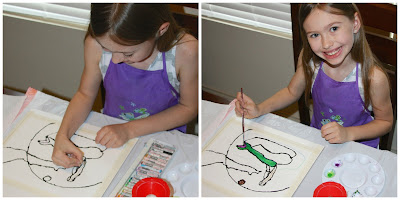
 |
| Glitter Paint Glaze |
 |
| Painting and Coloring Other Projects |
 |
| Symmetrical Mask with Motif Pattern Design |
 |
| Symmetrical Butterflies Camouflaged Use of Contrasting Colors |
- Cross-Curricular Lesson Plans
- Detailed Instructions
- Helpful Teaching Tips
- Variety of Art Mediums
- Usage Flexibility
- Choice of Presentation Formats
- Engaging Object-Oriented Lessons
- Child-Friendly
- Project Creation Success
- Historical and Cultural Background Knowledge
- I would make clickable Internet links within the videos giving immediate access to online content.
- I wish the program was available in DVD format making the lessons more portable. We could only watch them on our computer.
- Please continue to add more projects to each level. It would be great if eventually each level had 32-36 weekly lessons. Then, parents could choose one specific level to use each school year.
- I would appreciate leveled grid box drawing exercises for ALL projects allowing for more practice.
 |
| Alyssa's Final Art Projects |








Sounds & looks neat!
ReplyDelete